Software Guide for MTX-GTW and MTX-GATEWAY
Software Guide for MTX-GTW and MTX-GATEWAY
1. Environment Installation
The following guide has been certified for Ubuntu 12.04 LTS and 14.04 LTS. The necessary files are:
- The create/edit image tool ptxdist
- The crosscompilation toolchain OSELAS
- BSP adapted to MTX-GATEWAY and MTX-GTW
1.1 Pre-requisites
As pre-requisites to the environment installation, the following packs must be installed:
- autoconf
- gawk
- dialog
- ncurses-dev
- bison
- flex
- quilt
- texinfo
- gettext
- g++
- libxml-parser-perl
- python-dev
This installation can be carried out in Ubuntu by using the command apt-get install:
sudo apt-get install autoconf gawk dialog ncurses-dev bison flex quilt texinfo gettext g++ libxml-parser-perl python-dev
1.2 PTXdist Installation
The installation pack ptxdist can be downloaded from here
Once downloaded, decompress the folder using a temporary directory and execute the following commands:
cd ptxdist-2013.12.0
./configure
make
sudo make install
1.3 Obtaining toolchain
There are two ways of downloading toolchain:
1.3.1 Source version
This can be downloaded from here To install it correctly, the following steps must be followed:
- Modify the /opt file permissions in order to be able to edit it (chmod 777 /opt)
- Decompress the downloaded folder to a temporary directory
- Locate the newly-created directory and execute the following commands:
ptxdist select ptxconfigs/arm-v5te-linux-gnueabi_gcc-4.8.2_glibc-2.18_binutils-2.24_kernel-3.12-sanitized.ptxconfig
ptxdist go
Once completed, toolchain can be found in the /opt directory: /opt/OSELAS.Toolchain-2013.12.2 Note: The length of this process varies depending on the machine used and can take several hours in some cases to complete. For more information regarding the installation of different toolchains for the ptxdist environment, please consult this document: Ptxdist Guide
1.3.2 Precompiled version
In this link there is a compressed file with toolchain precompiled. To use it correctly, it should be decompressed in the /opt/ folder.
1.4 Obtaining BSP
The BSP for MTX-GATEWAY and MTX-GTW can be downloaded from here Once the folder is downloaded, we recommend that you decompress it in the /opt folder. This path shall be referred to in this document as <BSP_installation_patch>. (If following the recommendations, it would be /opt/MTX-GATEWAY-BSP-REV.0103/ )
2 Creating a complete image
2.1 Compiling
To be able to generate the first complete image, we need to specify the platform and default configuration in order to correctly configure the environment. To do this, we need to carry out the following steps:
$ cd <BSP_installation_path>
$ ptxdist platform configs/platforms/tqma28/tqma28/platformconfig
$ ptxdist select configs/systems/minimal/ptxconfig
$ ptxdist collection configs/platforms/tqma28/ptxcollection.tqma28
2.2 Image creation
To create a complete image, we must execute the following commands:
$ cd <BSP_installation_path>
$ ptxdist go
$ ptxdist images
The first command will compile all pre-selected utilities, including bootloader and kernel, whilst the second takes the result of this compilation and places it into a series of easy-to-use for the device’s update process. Note: In the default image configuration, the packages that correspond to JAVA virtual machine are selected. Therefore, it is necessary to follow the steps in Annex 7 to complete the compilation process without errors.
3 Updating the device’s image
3.1 Updates with Freescale’s MFG tool
The following steps will outline the steps to be followed to save and/or update a complete image using the module:
- Firstly, the MFG utility must be downloaded from the Freescale webpage link (the download is free, but registration to the site is required). Open the Programmers tab and download the folder IMX_MFG_TOOL.
- Decompress the downloaded folder.
- Decompress the generated image using ptxdict (file TX_ARM_BSP_Update-tqma28.zip) to the Profiles directory that is generated by decompressing the MFG tool.
- Open the MFG utility and select from the drop-down Profile menu the name that coincides with the generated file:
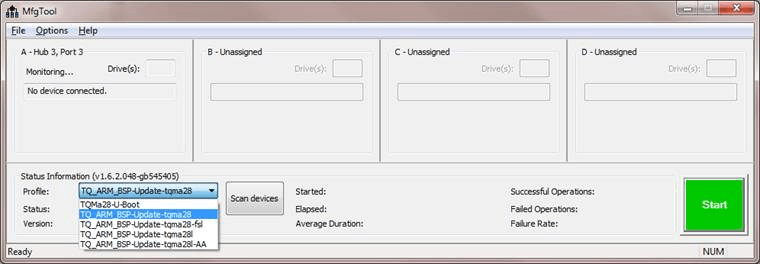
MFG Tool de Freescale
- Select Options -> Configuration -> eMMC only.
- Configure MTX-GATEWAY / MTX-GTW in USB recovery mode, modifying:
- MTX-GATEWAY – Switch SW1:
- SW1_7 and SW1_4 to ON and the rest to OFF.
- MTX-GTW – Switch SW1:
- SW1_1 and SW1_2 to ON and the rest to OFF.
- MTX-GATEWAY – Switch SW1:
- Connect a USB cable from the PC where the Freescale utility is installed and the MTX device. Connect the MTX device to its power source.
- If it is the first time that this process is carried out, a message will appear informing of the detection and installation of a HID USB driver.
- Once finished, the message “HID compatible device found” will appear in the MFG tool.
- Press START and wait for the process to finish. (Do not disconnect the USB cable or the power source until it has completed)
- Once the process has finished, disconnect the power and USB cable from the MTX device and return switch SW1 to its original position (all to OFF).
When the power source is connected once again to the device, the updated image will be shown on start up.
3.2 Updates via Ethernet
Under construction
4 Test Images
The following precompiled images are available for a quick evaluation of the module:
- Default image (provided with the device): Image
The default image has the following characteristics:
- Username “root” and password “root”
- Debug console available in the RS232 1 channel: RS232_TX1 and RS232_RX1 @ 115200 8N1
- Wi-Fi: Access Point with SSID: MTX-GTW and PASS: matrixelectronica
- Ethernet: Static IP configuration: 192.168.1.2 netmask 255.255.255.0.
- …
5 Image customization
In this section we will see the steps required to customize the images to be used on the device. It will deal with the configuration of kernel to add drivers, the process for adding and taking away applications as well as those for defining partitions used in the final image.
5.1 Kernel configuration
As well as constructing complete images, the ptxdist tool can be used to configure each element that comprises the image. In this section the steps required to configure kernel using ptxdist will be explained. Note: The default configuration included in the BSP for MTX-GATEWAY and MTX-GTW includes all the necessary drivers to interact with the interfaces and devices that are included. To access Kernel’s configuration, the following command must be executed:
cd <BSP_installation_path>
ptxdist menu
Once executed, the following screen will be shown: 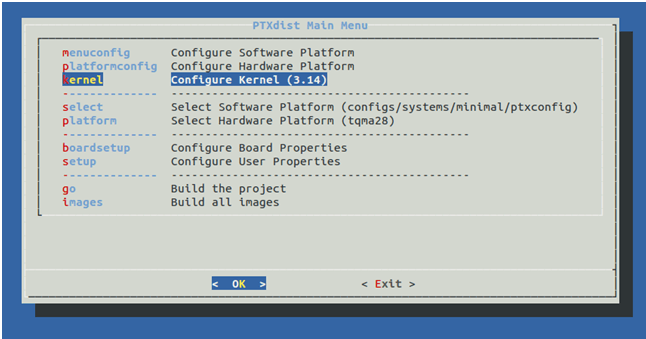 Then, we select the option “kernel Configure Kernel (3.14)”, which will bring a drop down menu, similar to that generated by the menuconfig command. Note: Before we can carry out any customization of kernel, we need to have generated a complete image. For this, see section 2.2.
5.2 Adding/Removing applications
In this section, the steps required to add or eliminate applications on the final image are explained. To access the utilities’ configuration, the following command must be executed:
cd <BSP_installation_path>
ptxdist menu
Once executed, the following screen will be shown:  The option “menuconfig Configure Software Platform” should be selected, which will bring up the following menu:
 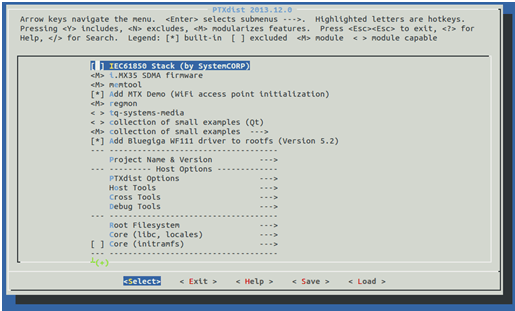 In this menu we can find all the utilities that can be included by default in the final image throughout the different sections. NOTE: To search for a particular utility, press the “/” key and type its name. For example, if we want to search for the “namocom” utility, we do the following:
 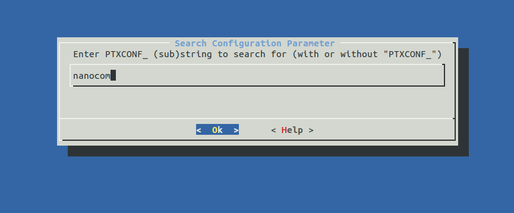 The utility will return all related results. In this case:
 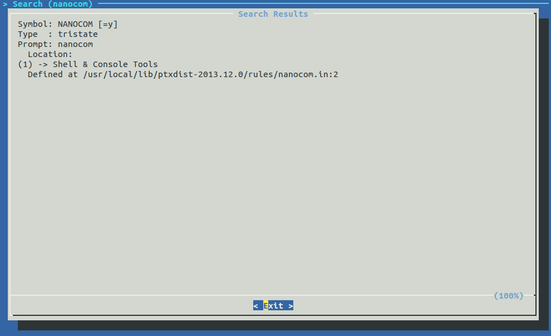 For each result that is returned, a Location section will appear that indicates the path where it can be selected.
5.3 Configuring images
Under construction
6 Using graphic environments to create, compile and debug applications
6.1 Eclipse
The following guide explains step-by-step how to integrate toolchain from ptxdist in the Eclipse environment in order to create and filter code in a graphic environment.
6.2 Netbeans
Under construction
6.3 QT Creator
Under construction
7 Using JAVA
The following steps explain how to add JAVA Virtual Machine to MTX-GATEWAY or MTX-GTW in order to use Java applications directly on the device.
7.1 Installing Java SDK using Ubuntu
Firstly, it is necessary to have previously installed SDK on the same PC as where the BSP for MTX-GATEWAY / MTX-GTW was installed. On a PC with Ubuntu 12.04 LTS, the steps to be followed are:
$ sudo apt-get install python-software-properties
$ sudo add-apt-repository ppa:webupd8team/java
$ sudo apt-get update
$ sudo apt-get install oracle-java7-installer
7.2 Configuring Ptxdist
Secondly, we need to modify the path to JAVA Virtual Machine so that the compilation process for the librxtx utility is carried out correctly. To access the configuration menu for ptxdist:
$ cd <BSP_path>
$ ptxdist setup
Select the option “Java SDK” and type the path /usr/lib/jvm/java-7-oracle/ Save the changes and exit the configuration menu.
7.3 Adding JAVA Virtual MAchine and the RXTX library to the final image
The steps to be followed are the following:
$ cd <BSP_path>
$ ptxdist menu
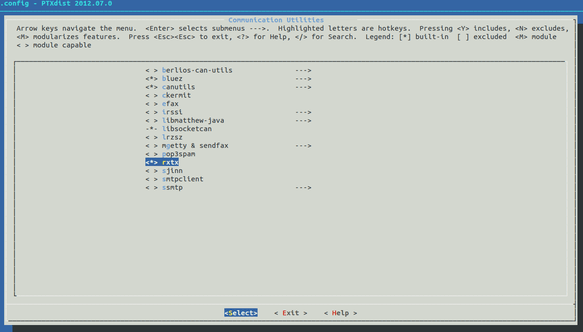
To add JAVA Virtual Machine, select the option “menuconfig” and in the new menu choose the option “Bytecode Engines / VMs” and select “Add JAVASE VM to rootfs”:  To add the RXTX library, choose the option “Communication Utilities” and select the option “rxtx”: