Titan – AN12: OpenVPN Under Demand
¿Buscas alguna otra cosa?
Table of Contents
Scene Details
This application note is intended to be a quick step-by-step that allows you to configure the OpenVPN of the Titan series router to offer a fast maintenance service in a timely manner.
That is to say, if at a moment, for reasons of maintenance, we want to connect remotely with a router and, or we do not know the public IP of the same or is behind NAT or a proxy, we can send an SMS to the router Titan and this will open in that instant and for a certain time, an OpenVPN session against our PC. This way we can access the router or whatever hangs behind it (connected by Ethernet) without problems. It is a very interesting way, because we will only launch the OpenVPN session from an authorized phone and after a time it will be closed, saving the data traffic (and therefore money) that means to maintain a continuous and permanent VPN session.
In this application note, the example digital certificates that can be downloaded from the Titan router itself will be used as an example. For an actual application it is recommended to generate your own certificates (or at least to establish authorized telephone numbers, so that only the OpenVPN connection can be activated from these telephone numbers).
That step by step will be done based on the following example:

That is, with this example it is intended that from “PC Server with OpenVPN” you can access “PLC” or remote “Router Titan” as if it were in the local network itself at any time.
Configurations and Prerequisites
In order to configure an OpenVPN, in this case we will use the standard UDP port 1194. Therefore the only requirement that the ADSL Router needs is that a NAT (port mapping) is performed from port 1194 to port 1194 of the LAN IP Of the PC Server with OpenVPN 192.168.1.28. It is also necessary that the IP address of the ADSL router is a fixed IP address.

Installing OpenVPN on PC Server
The first thing is to install the OpenVPN Software on the Server PC, that is, on the PC from which we want to connect to the rotuer. For a Windows system, on which we base this example, the following software can be installed.
http://swupdate.openvpn.org/community/releases/openvpn-2.2.2-install.exe
Once the software is installed, click “Start” and open the folder with the link “OpenVPN configuration file directory”.

In this directory we will have to do several things:
- Copy the files (certificates and keys) ca.crt, server.crt, server.key and dh1024.pem, into that directory. Only as an evaluation reason, you can download these example files from here. (You can also download them from the OpenVPN section of the Titan router itself).
ca.crt: https://www.dropbox.com/s/nxzmm4f4722plh4/ca.crt?dl=0
server.crt: https://www.dropbox.com/s/fuv652runkouwjk/server.crt?dl=0
server.key https://www.dropbox.com/s/yseozxs5icpt58z/server.key?dl=0
dh1024.pem https://www.dropbox.com/s/vcwby4y636thzoy/dh1024.pem?dl=0 - Copy the OpenVPN Server configuration file into the same directory. As an evaluation for this example, you can use the following:
config.ovpn https://www.dropbox.com/s/y23owbh0gacipmj/config.ovpn?dl=0 - Create a folder named ccd inside the previous folder. In this folder we will copy the file “client1” (which is the common name used when the client certificate was created). The file “client1” can be downloaded from here for this example:
client1 https://www.dropbox.com/s/0c8d43mkps2gf12/client1?dl=0
That is, in the “config” folder of “c:\Program Files (x86)\OpenVPN\config, we will have the following files (ca.crt, server.crt, server.key, dh1024.pem, server.ovpn) and Directory (ccd). Within the latter we will have the file “client1”.

Once this is done, the server is already configured. You just have to run it. So, go to start and execute “OpenVPN GUI”.

When you run it, an icon will appear on the taskbar next to the clock. Press Connect. The Open Server is already started, waiting for OpenVPN remote connections.

Setting up OpenVPN on a MTX-Router-Titan-3G
The client configuration is simple. The router configured with a LAN IP 192.168.2.2 and with 3G or 4G connectivity is assumed. To configure the VPN, simply go to the “VPN> OpenVPN Client” menu and configure the router as follows:

That is, we will download the sample certificates from that page (ca.crt, client.crt and client.key) to our PC and we will upload each one of them (next to each file has to be uploaded in green). Alternatively the same files can be downloaded from here:
ca.crt: https://www.dropbox.com/s/nxzmm4f4722plh4/ca.crt?dl=0
client.crt: https://www.dropbox.com/s/d0io4wdnq527zo0/client.crt?dl=0
client.key https://www.dropbox.com/s/yg6k55qkytamd2v/client.key?dl=0
In addition, we will have to leave the OpenVPN in “Under Request” mode, since we intend to launch it only with an SMS message at a certain time.
Next we will go to the “Other> SMS control” section and activate the AT commands as well as the authorized phone numbers.

OpenVPN Activation
To test OpenVPN we will send an SMS to the router. Specifically, the SMS message we will send, will be the next to open the tunnel 10 minutes.
mtx at^mtxtunnel=ovpnc,10
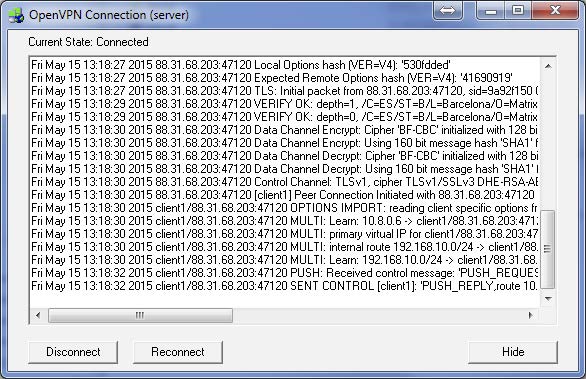
Once the SMS is sent to the router, we will see in the LOG of the PC OpenVPN Server, that the connection Works nd the tunnel is established.
From the OpenVPN Server PC you can perform a PING to the remote device: 192.168.2.20 and therefore you can access it. Exactly the same thing to access the remote Titan router.

The remote Titan router, we can connect to the LAN IP address of the remote Titan router. Of course we will also have access to the PLC device of address 192.168.2.20.

Problems
If it does not work, check:
- The IP Gateway assigned to the remote PLC (192.168.2.20) must correspond to the location of the router (192.168.2.2)
- There should be no firewall or antivirus in the PC OpenVPN server that prevents the connection to the VPN ports (in the case of example, UDP 1194). TCP protocol or another port can be chosen if desired
- Check that the NAT is done correctly in the ADSL router of your company
Remember
If you need to generate your own digital certificates, you will find out how to do it in the following link: https://openvpn.net/index.php/open-source/documentation/howto.html