Titan – AN41: IPSEC – Server IKEv2 – EAP Authentication
¿Buscas alguna otra cosa?
Table of Contents
Scenario Details
From a PC it is intended to remotely access the configuration of a Titan 4G router and the configuration of a PLC that is connected to the Ethernet port of said Titan router. All this through a secure IPSec type connection. It is intended to use IKEv2 and EAP authentication.
Description of the Example
Basically with this example it is intended to create an IPSec VPN from a PC (which has an IPSec Client software such as TheGreenBow which is used in this example) against a remote Titan 4G router that will act as an IPSec Server which has a turn connected a PLC to its Ethernet port.

Configuration and Previous Requirements
The basic requirement to be able to carry out the application is that the SIM card inserted in the Titan router that will act as IPSec Server must have a public and static IP address. This is necessary to be able to access remotely from a PC connected to the public internet. Also make sure that all the Titans have the correct time, since the management of generation and validity of the certificates needs it.
Titan Router IPSEC Configuration
The first thing to do is go to the “VPN> IPSEC” menu. For the planned configuration we will need the certificates “ca-cert.pem”, and “server-cert.pem”. Obviously also your private keys “ca-key.pem” and “server-key.pem”. At this point there are two possibilities. 1. If these certificates are available, they can be uploaded manually from the section marked in red:

2. If no certificates are available, the Titan router has a button that will create them. When you press the button, all certificates will be generated automatically. The process can take up to 5 minutes to finish. Press the “REFRESH” button to check the status of the process.
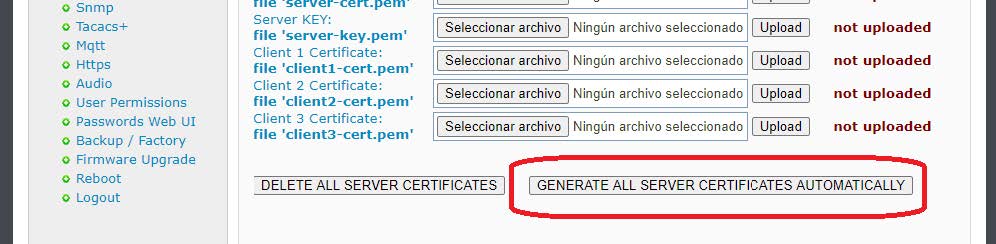
In this example, we will use the second option to automatically generate all certificates. To do this, the button “GENERATE ALL SERVER CERTIFICATES AUTOMATICALLY” must be pressed. Very important note: Make sure the router is on time before generating the certificates. After completing the process correctly, this will be the result: this content must be adapted to the example and inserted in the appropriate boxes. For “ipsec.conf”:

Once you have the necessary certificates, you must proceed to the configuration of the VPN itself. To do this, check the “Enabled” box at the beginning of this configuration page and press the “SAVE CONFIG” button.

Finally, since the IPSec service of the Titan router is based on strongswan, the files “ipsec.conf” and “ipsec.secrets” must be configured. The easiest thing is to go to the examples at the bottom of the page and obtain the example that is closest to what you want to configure. In the case of this application note, Example 1 is chosen, clicking (downloading) the corresponding files “ipsec.conf” and “ipsec.secrets”, which we will open with a notepad to obtain their content.

Said content must be adapted to the specific scenario of the application note and inserted in the appropriate boxes. For “ipsec.conf”:

And for “ipsec.secrets” (previously you must click on the “Show/Hide” legend to show the box):

And then the “SAVE CONFIG” button will be pressed, which will save the content of both files in the internal memory of the Titan router. Finally, if the IPSec service was not started when the router was started (that is, the “Enabled” box was not active), the router must be completely rebooted (“Other>Reboot” menu). If the IPSec service was already started (“Enabled” box active), you can just press the “RESTART IPSEC” button to restart the IPSec service with the new configuration without having to restart the router completely, a much faster option.
After restarting the router or pressing the “RESTART IPSEC” button (if the service was already active), the status of the IPSEC connection will appear as indicated below. If the Status box is blank, the service may not have started yet. Wait a few seconds and press the “REFRESH” button.

IPSEC Client Configuration
In this example, the popular TheGreenBow PC software will be used as the IPSec client software to connect against the Titan router. Below are some screenshots with the basic configuration of each section.
1. In the “Authentication” section of the IKEv2 type connection, the public IP address of the Titan router (in the case of this example, it is 176.80.171.249) and the EAP authentication method must be indicated. We will add one of the two users that we specify in the file “ipsec.secrets”:
Login: “user2”, Password: “mypass2”.


3. Finally, in the “Child SA” tab we indicate that you want to obtain the configuration of the Titan router itself. Following this, it is now possible to open the IPSec tunnel by right-clicking on the connection and pressing the “Open tunnel” option as shown in the following screen:


Checking Connectivity
If the connection has been made successfully, all that remains is to check the connectivity, that is, from the IPSec client PC, it is possible to access both the Titan router (IP: 192.168.1.2) and the PLC that hangs from it (IP: 192.168 1,200). For this it is possible to perform a few simple PINGs.
Ping performed from the PC to the Titan router through the IPSec VPN:

Ping made from the PC to the PLC through the IPSec VPN:
