Titan – AN10: Sending SMSs, Emails, SNMP Traps from a Modbus-TCP Device
¿Buscas alguna otra cosa?
Introduction
The Titan routers include all the typical features of a 2G/3G/4G router. However, they also include a series of additional features that help make it one of the leading market routers based on the number of features it includes.
One of these additional features is the ability to execute AT commands via Modbus TCP. In other words, it is possible to configure the Titan router as a Modbus TCP Slave device, meaning that from a device configured to be a Modbus TCP Master, we can send AT commands via Modbus TCP. In this way, from the Modbus TCP Master device, we can read and receive SMS messages, send emails, send SNMP TRAPS, find out the current time/date, GSM network coverage, etc. All of this using the Titan router.
Description of the Example
We have a Modbus TCP Master device (PLC). We need to be able to send/receive SMS messages, and send SNMP TRAPS via Modbus TCP.
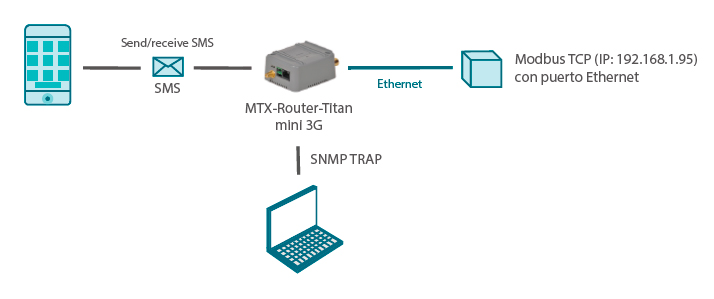
(Image: Sending/Receiving SMS messages; MODBUS TCP device (IP) with an Ethernet port)
Configuring the Modbus TCP Slave
The first thing to be done is to configure the Titan device so that is acts as a Modbus TCP Slave. To do this, we must go to the menu “Other > Modbus TCP Slave”, where we must select the option “Enabled” as well as the TCP port (which is, by default, TCP 502).

It is interesting to see the lower part of the screen where a summary of the Modbus TCP registers mapping is included.
Once the router is configured, we must reset the device so that the new configuration becomes active.
Sending SMS Messages via Modbus TCP
Now we must send an SMS message. As previously mentioned, this is possible from any device or Modbus TCP Master simulator.
We are going to send an SMS with the text “ALARMA” to the cell phone number 681319891. The AT command to send an SMS from the Titan router is as follows:
AT^MTXTUNNEL=SMS,681319891,ALARMA
In ASCII code, this would be:
| 100 | 101 | 102 | 103 | 104 | 105 | 106 | 107 | 108 | 109 | 110 | 111 | 112 | 113 | 114 | 115 |
| A | T | ^ | M | T | X | T | U | N | N | E | L | = | S | M | S |
| 65 | 84 | 94 | 77 | 84 | 88 | 84 | 85 | 78 | 78 | 69 | 76 | 61 | 83 | 77 | 83 |
| 116 | 117 | 118 | 119 | 120 | 121 | 122 | 123 | 124 | 125 | 126 | 127 | 128 | 129 | 130 | 131 |
| , | 6 | 8 | 1 | 3 | 1 | 9 | 8 | 9 | 1 | , | A | L | A | R | M |
| 44 | 54 | 56 | 49 | 51 | 49 | 57 | 56 | 57 | 49 | 44 | 65 | 76 | 65 | 82 | 77 |
| 132 |
| A |
| 65 |
Therefore, we will write this command (all 33 characters) in the Titan router from register 100 (inclusive). This is the “memory” where the AT command is stored ready for execution.
Once completed, we must execute the AT command. To do this, we must write in register 98 a value that is equal to the length of the AT command – in this case 33.
Once register 98 includes this value, the AT command will be executed and the SMS should be received seconds later. To check the response to the AT command, we can read register 99, which includes the length of the response. In this case, we read a value of 21. This means that we must read 21 registers from the position 500, which is where the response is stored. Reading, we see the following:
| 500 | 501 | 502 | 503 | 504 | 505 | 506 | 507 | 508 | 509 |
| [Cr] | [Lf] | [Cr] | [Lf] | + | C | M | G | S | : |
| 13 | 10 | 13 | 10 | 43 | 67 | 77 | 71 | 83 | 58 |
| 510 | 511 | 512 | 513 | 514 | 515 | 516 | 517 | 518 | 519 | 520 |
| 9 | 4 | [Cr] | [Lf] | [Cr] | [Lf] | O | K | [Cr] | [Lf] | |
| 32 | 57 | 52 | 13 | 10 | 13 | 10 | 79 | 75 | 13 | 10 |
Here we must check for “OK” in order to check that the AT command was correctly executed.
Receiving SMS Messages via Modbus TCP
Receiving SMS messages via Modbus TCP is also a simple process. In this case the PLC that acts as a Modbus TCP Master must periodically carry out a polling process in register 1000. If this register contains a value of “1”, this indicates that there is an SMS waiting to be read.
The next step is to read register 1001, which indicates the length of the cell phone number that has sent the SMS. Usually, this will be contained from registers 1002 to 1019.
To read the body text, we must read register 1020, which contains the length of the message. The message will be located in registers 1021 to 1180.
Once the SMS is read, we must write a value of “0” in register 1000 so that if the register has a value of “1” in the future, we know that this is due to an unread message.

Sending a TRAP via Modbus TCP
The procedure for sending an SNMP TRAP is exactly the same as for sending SMS messages, except for the AT command. Instead of sending a command like the following:
AT^MTXTUNNEL=SMS,681319891,ALARMA
We would have execute a command as we did before (transforming it into ASCII code), but adapted, as follows:
AT^MTXTUNNEL=TRAP,.1.3.6.1.4.1.45711.1.1.11.1.1;myMessage;5
In other words, we must specify the OID (in this example “.1.3.6.1.4.1.45711.1.1.11.1.1”), as well as a field for the message of the text and another field for the severity (in this case, “5”).
| 100 | 101 | 102 | 103 | 104 | 105 | 106 | 107 | 108 | 109 | 110 | 111 | 112 | 113 | 114 | 115 |
| A | T | ^ | M | T | X | T | U | N | N | E | L | = | T | R | A |
| 65 | 84 | 94 | 77 | 84 | 88 | 84 | 85 | 78 | 78 | 69 | 76 | 61 | 84 | 82 | 65 |
| 116 | 117 | 118 | 119 | 120 | 121 | 122 | 123 | 124 | 125 | 126 | 127 | 128 | 129 | 130 | 131 |
| P | , | . | 1 | . | 3 | . | 6 | . | 1 | . | 4 | . | 1 | . | 4 |
| 80 | 44 | 46 | 49 | 46 | 51 | 46 | 54 | 46 | 49 | 46 | 52 | 46 | 49 | 46 | 52 |
| 132 | 133 | 134 | 135 | 136 | 137 | 138 | 139 | 140 | 141 | 142 | 143 | 144 | 145 | 146 | 147 |
| 5 | 7 | 1 | 1 | . | 1 | . | 1 | . | 1 | 1 | . | 1 | . | 1 | ; |
| 53 | 55 | 49 | 49 | 46 | 49 | 46 | 49 | 46 | 49 | 49 | 46 | 49 | 46 | 49 | 59 |
| 148 | 149 | 150 | 151 | 152 | 153 | 154 | 155 | 156 | 157 | 158 |
| m | y | M | e | s | s | a | g | e | ; | 5 |
| 109 | 121 | 77 | 101 | 115 | 115 | 97 | 103 | 101 | 59 | 53 |
The response to the command is completed in the same way as for the SMS explained in this Application Note. Upon seeing the text “OK”, we can confirm that the command was correctly executed.
To which IP address is the TRAP sent?
The TRAP is sent to the IP address:port which is specified in the configuration menu “External Devices > Modbus RTU/TCP”.

Sending an Email via Modbus TCP
The procedure for sending emails is exactly the same as for SMS or TRAPS, substituting the AT command for the following:
AT^MTXTUNNEL=EMAIL,jgallego@matrix.es,ALARMA
The current Firmware version of the Titan device (v3.07) only allows for emails to be sent by specifying the recipient’s email address and the subject of the email.
Remember that before sending any message, the Titan router must be configured with the appropriate parameters for the SMTP servers to be used, using the menu “Other > Email Configuration”.