Titan – AN48: Internal LoRa server
¿Buscas alguna otra cosa?
Table of Contents
Scenario Details
MTX-StarLora is featured as LoRa-4G gateway using external LoRa Server. Check our app note 39.
MTX-StarLora is also featured with integrated Lora Server inside. That means that MTX-StarLora does not depend on external LoRa Servers, like TTN & among others, all the control over other gateways and external Lora devices is done internally. This is perfect to be independent of external parties.
MTX-StarLora it is integrated ChirpStack https://www.chirpstack.io/
Features:
- End-devices Class A, B and C
- Adaptative data-rate
- Live frame-logging
- Channel (re)configuration
- Multi-tenant
- APIs and integration
- LoRaWAN 1.0 and 1.1 compatible
Description of the Example
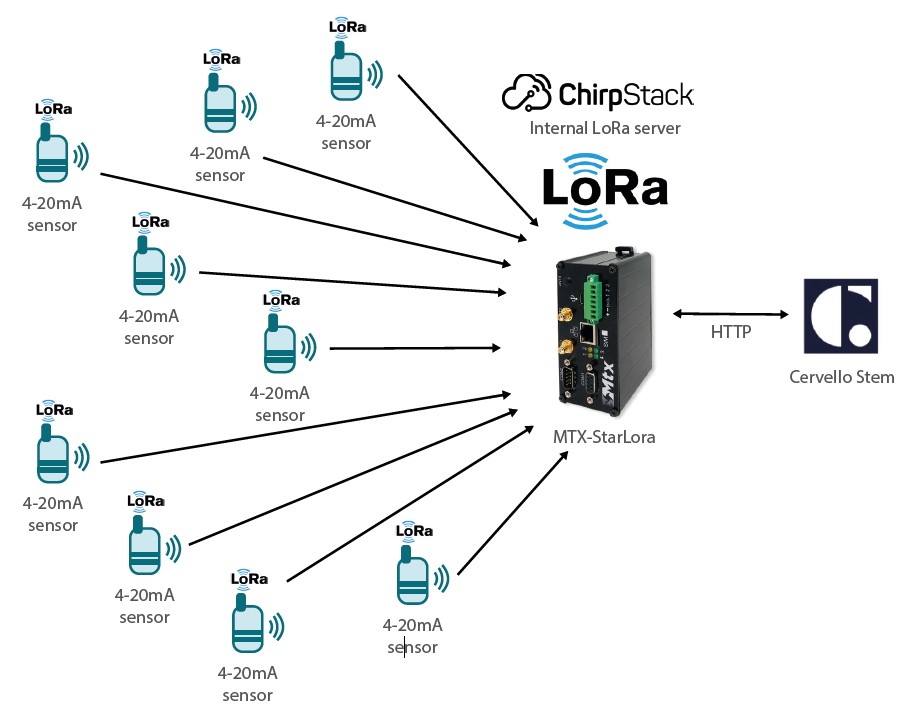
This application note shows step by step how to create a LoRa network, with remote LoRa sensors connected and managed by internal LoRa server.
MTX-StarLora will use cellular LTE 4G as WAN interface, will collect all LoRa sensors information and will be sent to end-party cloud integration platform.
Chirpstack LoRa internal server will send LoRa sensor payload datas using HTTPS integration to Cervello platform.
Cervello cloud platform is perfect for this application because the VPI programming featureS as can receive and manage all payloads, filter, and decode this frame payload into telemetries values. Telemetries will be stored and can be displayed in visual tables, graphs…
Cervello will be also used a Device Manager: we can collect DNS information (IP address, time, IMEI, signal strength….) and can be used to group, and control using AT commands
LoRa sensors: we can recommend/tested following nodes:
- Adeunis
- RAK
- URSALINK
Our new MTX-StarLora with Lora capabilities has also all MTX-StarLora-Titan features, so you still can use serial RS232/RS485/USB – Eth-4G gateways, Modbus, Datalogger, VPN, etc making one of the most industrial M2M-IoT featured complete router in the market.
Please check App note 49 if you want to extend the LoRa network with a slave gateway and have more deep technical aspect on LoRa Server implementation.
MTX-StarLora Configuration
First access to Titan using an Ethernet cable with the default 192.168.1.2 IP Address.
User: admin
Password: admin

Then, it is needed to configure MTX-StarLora with SIM card network APN information.
WAN -> Basic Setting
Please take care about “Sim PIN” (if SIM card is PIN enabled) and most important ones
“APN”, “Username” and “Password”.
Please keep filled Call Center field as showed, *99***1#

Then click on “SAVE CONFIG” button and important, restart router using menu.
Other->Reboot to allow router restart with new configuration and connect to internet.
Check WAN IP and keep this value.

In this example, LAN interface is used as it is connected directly to another Router with internet connection, will use 4G WAN as backup/failure.
Menu: Wan->Basic Setting->Utils.
Click on Failover config button and fill in your case the Gateway IP. If this fail, WAN will be switched to use 4G cellular network.

To configure LAN, MTX-StarLora has two Ethernet ports, using number one:

To configure the DYNDNS, fill in the following fields:

Server
Domain
Login
Password
Then, you can FOREVER even if IP public dynamic has been changed, to access TITAN.

You can use other MTX-StarLora features as Serial Gateways, Modbus, Logger, MQTT, VPN, SMS…
LoRa Configuration
Please Enable Lora Server.
External Devices – LoRa Gateway it is not needed to use internal LoRa Server.

Please fill Other->MQTT Broker to enable listening port 1883

Then it is time to open Lora Server.

New window will be opened with port 8080
Router address (normally 192.168.1.2:8080)

My case http://starlora.ddns.net:8080
ChirpStack Server will be opened.
- Default user: admin
- Default password: admin
You can find information, guides, help and community forum at
https://www.chirpstack.io/
and
https://www.chirpstack.io/project/guides/connect-gateway/
ChirpStack Configuration Steps
It is mandatory to follow all this steps to create a Lora Network.
- Step 1: Add a server
- Step 2: Add/create a Gateway profile —- connected to 1) Server
- Step 3: Add/create a Service profile — must be connected to 1) Server
- Step 4: Add/create a Device profile – must be connected to 1) Server
- Step 5: Add/create a Gateway – must be connected to 1) Server and 2) Gateway profile
- Step 6: Add/create an Application — must be connected to 3) Service Profile
- Step 7: Add Devices – must be connected to 4) Device Profile
- Repeat step 7 to add other external devices
Step 1: Adding a Server
Click on Network Server -> Add
Fill with a string in Network-server-name, example MTX-StarLora-JS-LORA. Fill with a string in Network-server server 127.0.0.1:8000.

Fill Gateway Discovery as follow:

Check if Network Server has been created:

Step 2: Adding/Creating a Gateway Profile
Click on Gateway-profiles:

And click on create:

Fill some string name for the Gateway profile and use your Network Server created in step 1.

Check if Gateway Profile is linked to Network Server.

Step 3: Adding/Creating a Service Profile
Click on Service-profiles:

Fill with your Step 1 Network Server and Step 2 Service Profile names. Other fields please read Chirpstack documentation.

As an example:

Step 4: Adding/Creating a Device Profile
Click on Device-profiles:

And fill a name for Device-profile-name (mandatory)
Check your LoRaWan MAC version and other parameters as your LoRa scenario.

If you want to add external devices using OTAA pls check JOIN fields. If you will use ABP keys leave this box unmarked.

In this example, we will use default DEVEUI and Lora Keys stored in the nodes (some explanation in Step 7)
Fill CLASS-B and CLASS-C windows with YOUR specified LoRa scenario or adjust to your best performance features. This are some examples:


CODEC is a good ChirpStack feature. This is intented to get an object with extracted payload information and not all payload from the node.
If you are going to use just one type of same end LoRaWan sensors, you can ask your node manufacturer and fill/code. Read documentation/help. We will not use this feature in this application note.

At the end of this application note you can see how we have CODEC code integrated in end IOT cloud Cervello.
Step 5: Adding/Creating a Gateway
This section may be not important but it is, we have to add and create the MTX-StarLora as a Gateway. Click on Gateways:

Then click on Create.

And write some name on Gateway name and some Gateway description string.
Also fill some Gateway ID (Identification), as example 010203040a0b0c0d
In this example, Gateway name is JS-GATEWAY. Has also to use the Gateway-profile set as step 2.

If successful you will get some live information:

Step 6: Adding/Creating an Application
We are almost finishing, next point is creating a new Application. In this section we will also add the end LoRaWan nodes devices and see the payload.
Create an Application.
Click on Application -> Create

Fill Application name and Application description with some text strings and use Service Profile configured in step 3.

As an example this is an application created.

Step 7: Adding Devices
IMPORTANT POINT: Now we will create and add new end nodes LoRaWan devices.

Take now the information of your LoRaWan device node.
You will need mandatory information:
- DEVICE EUI (DEV EUI)
- APPLICATION KEY (APP KEY)
You can get this information from your device provider, and sometimes, connecting the end remote device to your laptop.
HOW TO USE ADEUNIS END DEVICE
COMFORT ARF8275AAC

Here you can extract DEV EUI
18B260000007AB
Introduce this data into Device description. Fill with 00 at the beginning just in case.

Goto into Devices/MyDevice:


Copy the Lora App key.

Keep Gen Application key in blank.
And then click on SET DEVICE KEYS.

Wait till frames are received.


Click Device Data. Wait. Wait.

You will find some join and up messages. Click on up and extract.

adr:true
dr:0
fCnt:323
fPort:1
data:”TIAA5Sc=”
objectJSON:””
Read the manual and extract the information from this string.
Data is Base64 have to decode to HEX. Use
https://cryptii.com/pipes/base64-to-hex
4c 80 00 e5 27 -> 4c8000e527
You can use Adeunis manual but use https://codec-adeunis.com/decoder
{
  "type": "0x4c Comfort data",
  "status": {
    "frameCounter": 4,
    "hardwareError": false,
    "lowBattery": false,
    "configurationDone": false,
    "configurationInconsistency": false
  },
  "decodingInfo": "values: [t=0, t-1, t-2, ...]",
  "temperature": {
    "unit": "°C",
    "values": [
      22.9
    ]
  },
  "humidity": {
    "unit": "%",
    "values": [
      39
    ]
  }
}
Another example with Ursalink device. Connect AM100 to computer using USB cable and open ToolBox.

In this software you can find Device EUI. Rembember this number is like IMEI, MAC… stored in the device and normally, can not be changed. In this case, we will use Application Key generated randomly by ChirpStark and we will copy it to Ursalink.


An important check on the device side is see if its Activaded.

Check now again Devices traffic messages:

Click on up message, and again similar information structure, information about network, LoRa and the data.
data:”A2fUAARoSQZlIgAbAAYABWoAAA==” ???
UC11: • data:”AWfZAAJoPw==”
Remote io home • data:”CQEA”
This sensor can read temperature, humidity and has a presence PIR. Adding more nodes will be like this:

Keep in mind the LoRa frames, payloads are not getting out the ChirpStack server and/or be in Titan. Those are separate applications and we can not use any Titan information way (mqtt, http,,, etc). The only way to extract and send that information is, in Applications, use Integrations. Go to Applications>Integrations. You will find some integration with end cloud services:
HTTP
AWS SNS
AZURE
GCP
INFLUXDB
myDevices
SEMTECH
ThingBoards.io
We will use HTTP as maybe the easy way to POST all lora frame to a Server.

Click on EDIT.
And fill the information.
In following example, we will use Cervello cloud platform to collect all the Lora payloads, decode and create simple Telemetries values.
Cervello collect information in a JSON payload (among other). Just adjust 2 headers and, the most important field is the URL.
In our case, we must fill in the URL the ID and password to connect properly to Cervello. You can also see we have created in Cervello a topic to receive these frames.

HTTP Integration Using Cervello Stem
Create a NEW DEVICE (an already Organization created is needed, if not, create a new one).
Fill in name field some name, in our example, MTX-StarLora-STAR-LORA-TEST. Fill in Description some description, in our example, TEST LORA HTTP.
Device type: GATEWAY
Communication Protocol: DEFAULT
And Connectivity Media: Other
Then, Device Credentials are created.
Please keep attention. Click on Device Credentials.Then a box appears with
- CLIENT ID
- ACCESS KEY
- ACCESS TOKEN

Copy them in some document as Access Token will not appear anymore. In our case,

We have:
- Client ID: jtbqr5gtypev9u
- Access key: apm87w1pcysqaw
- Access tocken: du79dfe4qk8ptj
The URL in ChripStack is then:
https://broker.release.cervello.io?c=jtbqr5gtypev9u&u=apm87w1pcysqaw&p=du79dfe4qk8ptj&t=/lora/debug
In Cervello we will use VPI programming interface with the following steps:
- Create an application (our example AppStarLora)
- Link device to application
Create a VPI, in our case VPI-StarLora name.
Add following block:
Device Data Listener and write a name to Topic, in our example, lora/debug

On debug you can see some live LoRa packet, this case is an Adeunis end node.
{
  "organizationId": "1973cbd9-75a2-4599-aa90-6bae7f37a204",
  "originatorId": "b89dd4ed-9297-424b-8e18-020df9662c5d",
  "deviceId": "b89dd4ed-9297-424b-8e18-020df9662c5d",
  "deviceName": "MTX-StarLora-STAR-LORA-TEST",
  "referenceName": null,
  "applications": [
    "82e3c562-48eb-4223-9056-21449b44f684"
  ],
  "assets": [],
  "tags": [],
  "customFields": null,
  "isPublic": false,
  "clientId": "jtbqr5gtypev9u",
  "topic": "/lora/debug",
  "payload": {
    "applicationID": "1",
    "applicationName": "JS-APP",
    "deviceName": "COMFORT",
    "devEUI": "ABiyYAAAB6s=",
    "rxInfo": [
      {
        "gatewayID": "AQIDBAoLDA0=",
        "time": null,
        "timeSinceGPSEpoch": null,
        "rssi": -47,
        "loRaSNR": 10.5,
        "channel": 4,
        "rfChain": 0,
        "board": 0,
        "antenna": 0,
        "location": {
          "latitude": 40.39924,
          "longitude": -3.71709,
          "altitude": 609,
          "source": "UNKNOWN",
          "accuracy": 0
        },
        "fineTimestampType": "NONE",
        "context": "dUmrDA==",
        "uplinkID": "lhkyE2YbTg2sHkKG7C0krw==",
        "crcStatus": "CRC_OK"
      }
    ],
    "txInfo": {
      "frequency": 867300000,
      "modulation": "LORA",
      "loRaModulationInfo": {
        "bandwidth": 125,
        "spreadingFactor": 12,
        "codeRate": "4/5",
        "polarizationInversion": false
      }
    },
   "adr": true,
    "dr": 0,
    "fCnt": 416,
    "fPort": 1,
    "data": "TCAA5Cg=",
    "objectJSON": "",
    "tags": {},
    "confirmedUplink": true,
    "devAddr": "BaQxnw=="
  },
  "time": 1612525208425,
  "action": "message_publish"
This other is the URSALINK AM100.
{
  "organizationId": "1973cbd9-75a2-4599-aa90-6bae7f37a204",
  "originatorId": "b89dd4ed-9297-424b-8e18-020df9662c5d",
  "deviceId": "b89dd4ed-9297-424b-8e18-020df9662c5d",
  "deviceName": "MTX-StarLora-STAR-LORA-TEST",
  "referenceName": null,
  "applications": [
    "82e3c562-48eb-4223-9056-21449b44f684"
  ],
  "assets": [],
  "tags": [],
  "customFields": null,
  "isPublic": false,
  "clientId": "jtbqr5gtypev9u",
  "topic": "/lora/debug",
  "payload": {
    "applicationID": "1",
    "applicationName": "JS-APP",
    "deviceName": "AM100",
    "devEUI": "JOEkEnohcgA=",
    "rxInfo": [
      {
        "gatewayID": "AQIDBAoLDA0=",
        "time": null,
        "timeSinceGPSEpoch": null,
        "rssi": -40,
        "loRaSNR": 12.8,
        "channel": 4,
        "rfChain": 0,
        "board": 0,
        "antenna": 0,
        "location": {
          "latitude": 40.39924,
          "longitude": -3.71709,
          "altitude": 609,
          "source": "UNKNOWN",
          "accuracy": 0
        },
        "fineTimestampType": "NONE",
        "context": "fhjurA==",
        "uplinkID": "q9xQmrwcQSadGQo+iSI2Tw==",
        "crcStatus": "CRC_OK"
}
    ],
    "txInfo": {
      "frequency": 867300000,
      "modulation": "LORA",
      "loRaModulationInfo": {
        "bandwidth": 125,
        "spreadingFactor": 10,
        "codeRate": "4/5",
        "polarizationInversion": false
      }
    },
    "adr": true,
    "dr": 2,
    "fCnt": 3,
    "fPort": 85,
    "data": "AXVkA2f1AARoUQZlFAAaAAkABWoAAANn9QAEaE8GZRQAGgAJAAVqAAA=",
    "objectJSON": "",
    "tags": {},
    "confirmedUplink": true,
    "devAddr": "BfRdnw=="
  },
  "time": 1612525356533,
  "action": "message_publish"
}
Our task now is filter the frames using ID, in our Switch block.


Function block is to decode the frame information. Ask your LoRaWan end device to get some information and example code. It is usually named CODEC.
/**
 * Ursalink AM100 / AM102 Payload Decoder
 *
 * definition [channel-id] [channel-type] [channel-data]
 *
 * 01: battery      -> 0x01 0x75 [1byte]  Unit: %
 * 03: temperature  -> 0x03 0x67 [2bytes] Unit: °C
 * 04: humidity     -> 0x04 0x68 [1byte]  Unit: %
 * 05: PIR          -> 0x05 0x6A [2bytes]
 * 06: illumination -> 0x06 0x65 [6bytes] Unit: lux
 * ------------------------------------------ AM100
 * 07: CO2          -> 0x07 0x7D [2bytes] Unit: ppm
 * 08: TVOC         -> 0x08 0x7D [2bytes] Unit: ppb
 * 09: Pressure     -> 0x09 0x73 [2bytes] Unit: hPa
 * ------------------------------------------ AM102
 */
function Decoder(bytes) {
    var decoded = {};

    for (var i = 0; i < bytes.length;) {
        var channel_id = bytes[i++];
        var channel_type = bytes[i++];
        // BATTERY
        if (channel_id === 0x01 && channel_type === 0x75) {
            decoded.battery = bytes[i];
            i += 1;
        }
        // TEMPERATURE
        else if (channel_id === 0x03 && channel_type === 0x67) {
            decoded.temperature = readInt16LE(bytes.slice(i, i + 2)) / 10;
            i += 2;
        }
        // HUMIDITY
        else if (channel_id === 0x04 && channel_type === 0x68) {
            decoded.humidity = bytes[i] / 2;
            i += 1;
        }
        // PIR
        else if (channel_id === 0x05 && channel_type === 0x6A) {
            decoded.activity = readInt16LE(bytes.slice(i, i + 2));
            i += 2;
        }
        // LIGHT
        else if (channel_id === 0x06 && channel_type === 0x65) {
            decoded.illumination = readInt16LE(bytes.slice(i, i+2));
           // decoded.infrared_and_visible = readInt16LE(bytes.slice(i + 2, i + 4));
           // decoded.infrared = readInt16LE(bytes.slice(i + 4, i + 6));
            i += 6;
        }
        // CO2
        else if (channel_id === 0x07 && channel_type === 0x7D) {
            decoded.co2 = readInt16LE(bytes.slice(i, i + 2));
            i += 2;
        }
        // TVOC
        else if (channel_id === 0x08 && channel_type === 0x7D) {
            decoded.tvoc = readInt16LE(bytes.slice(i, i + 2));
            i += 2;
        }
        // PRESSURE
        else if (channel_id === 0x09 && channel_type === 0x73) {
            decoded.pressure = readInt16LE(bytes.slice(i, i + 2))/10;
            i += 2;
        } else {
            break;
        }
    }
    return decoded;
}

/* ******************************************
 * bytes to number
 ********************************************/
function readUInt16LE(bytes) {
    var value = (bytes[1] << 8) + bytes[0]; return value & 0xffff; } function readInt16LE(bytes) { var ref = readUInt16LE(bytes); return ref > 0x7fff ? ref - 0x10000 : ref;
}

/* ******************************************
 * payload processing
 ********************************************/

var hexBase64Payload = data.payload.data;

var hexPayload = Buffer.from(hexBase64Payload,'base64');
var decodedPayload = Decoder(Buffer.from(hexPayload,'hex'));


var msg = {
    "device_name": data.payload.deviceName,
    "deviceId": data.deviceId,
    "data": {}
}

msg["data"][data.payload.deviceName] = {
           data: decodedPayload }


send(0, msg);
Almost finished. In VPI, telemetry block create one TELEMETRY, in our example, will take just TEMP as a Telemetry value.

In this example, we have created a peripheral device which will allow separate telemetries and information from other nodes. This way will also do easy to create groups, tags, for a better end user experience.
Clink on AM100 peripheral device in Device Manager and get all information.
