Titan – AN49: LoRa server with slave LoRa gateway
¿Buscas alguna otra cosa?
Table of Contents
Scenario Details
MTX-StarLora is featured as LoRa-4G gateway packet forwarder using external LoRa Server. Check our app note 39.
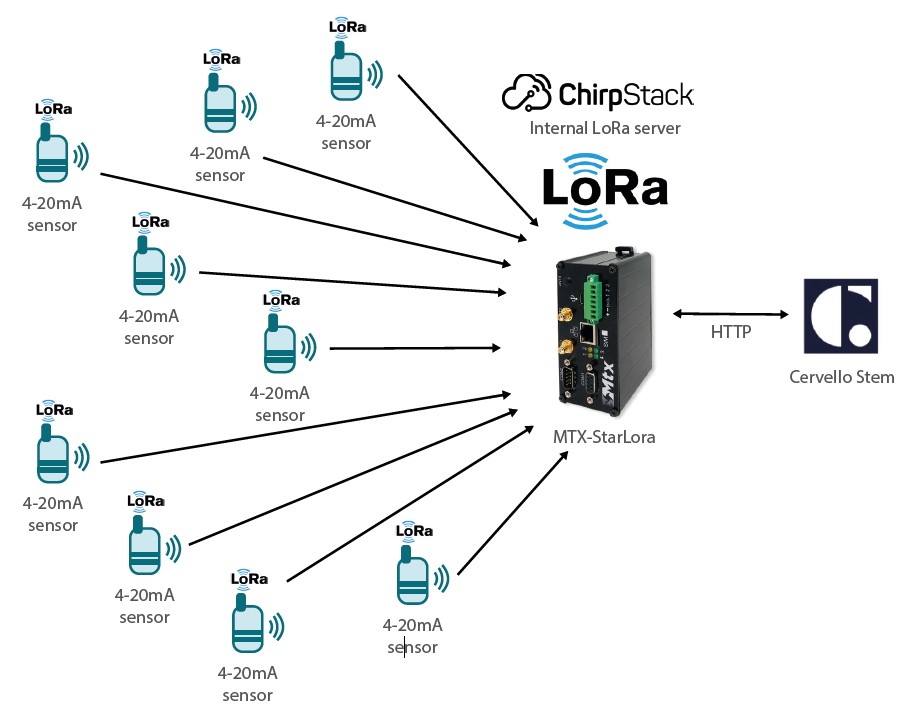
MTX-StarLora is also featured with ChirpStack integrated Lora Server inside and we’ll add more remote gateways and nodes Check our app note 48.
This is our implementation block of our TITAN-Router with LoraServer.
In a regular way, Titan router changes UDP messages between its packet forwarder and LoRa server Gateway bridge and MQTT messages between Titan-Router Gateway bridge and MQTT ChirpStack Lora Server broker.
In this application note we will interchange messages between two remotes devices, one Titan-Lora Router acting just as packet forwarder and another remote Titan-Lora (master) receiving the messages in MQTT 1883 open port and ChirpStack blocks.
LoRa blocks:

Option 1. UDP packets. Option 2. Green MQTT transmission:
- PACKET FORDAWDER (send raw packets using UDP to a Gateway Bridge).
- GATEWAY BRIDGE converts raw UDP packets into MQTT
- MQTT BROKER, is the connection point fo MQTT client, same used for Gateway Bridge and ChirpStack Lora Server
Description of the Example
This application note is a continuation of AN40 and shows step by step how to extend a LoRa network, with remote LoRa sensors connected and managed by internal LoRa server device and some other in remote LoRa gateway device.

In other words, we’ll have two LoRa Gateways, one will receive and transmit LoRa packets end devices at his range and will forward to another LoRa Gateway with a LoRa server inside. The packet forwarder is like a slave and the LoRa Server is like a master.
Master LoRa Server Device can handle also LoRa nodes at this range.

Gateway A is packet forwarder – bridge (like a slave)
Gateway B has LoRa server (like a master of A)
ALL end LoRa remote nodes at RF distance range of salve A will be handled by LoRa server B.
MTX-StarLora Configuration
Access: First step in access to Titan using Ethernet cable with default 192.168.1.2 IP Address.
User: admin
Password: admin
Check WAN IP and keep this value.
You can use other MTX-StarLora features as Serial Gateways, Modbus, Logger, MQTT, VPN, SMS…
LoRa Configuration
Slave configuration:

This is different to Packet fowarder as we are not using external LoRa server, we will point to MQTT url (slave IP address:port1883). In LoRa mode use Gateway LoRa – Bridge MQTT.
In Master Configuration there is nothing special to do.

Open Master LoRa Webserver:

ChirpStack configuration:
Add the slave Gateway information. Create and write a name & description. Use LoraServer and Gateway profile already created.
ChirpStack Configuration Steps
In application note AN48 it is explained how to create a Lora Network. Once all steps has been follow, just repite step 5 to add the slave gateway and repite step 7 to add remote devices.
- Add a server
- Add/create a Gateway profile – connected to 1) Server
- Add/create a Service profile – must be connected to 1) Server
- Add/create a Device profile – must be connected to 1) Server
- Add/create a Gateway – must be connected to 1) Server and 2) Gateway profile
- Add/create an Application – must be connected to 3) Service Profile
- Add Devices – must be connected to 4) Device Profile
- Repeat step 7 to add other external devices
Adding the Slave Gateway:

Please check slave Gateway is connected.

Gateway ID must be different, please take care of declare the ID in the Titan configuration.
All the LoRaWan (in the RF range of Slave device) nodes must be added at the master LoRa gateway server device. Please check AN48 if you need any help.
You will need Device EUI and LoRa APP KEY

Check Device Data and WAIT for a LoRa payload.
You can add more LoRa nodes wich are near the range of slave MTX-StarLoRa as if it would be at the range of the master one.

And finally, use application:

And check in Cervello platform to receive the Lora frame payload.
